Making an 1840s Fan Front Dress | Laughing Moon 114

I completed my first 1840s dress in February 2019, after working on it for over a year. This dress ended up being a great example of when taking it slow and steady pays off. It's great fun to wear and the hundreds of hours of hand sewing that went into it are well appreciated. I wore this dress so many times (and loaned it to friends) that I lost count of how many times it was worn!
Materials & Design
For my first 1840s dress, I really wanted to try making the gathered fan front style that was so popular during that time. Learn more about the different types of 1840s bodice styles here!
I bought this cotton print from Hancock Fabrics for $4 in 2017. It has a dark blue ground overlaid with meandering yellow vines and a light blue trellis. To my surprise, I later found a few examples of extant 1840s dresses that had an extremely similar print!

Pattern
I used Laughing Moon #114 to create my fan front 1840s dress. This pattern can make several types of fan front (gathered, pleated) and dart front mid 19th century bodices. The pattern includes instructions for 3 types of bodices, 5 types of sleeves, a pelerine, and undersleeves!
I highly recommend Laughing Moon 114 for 1840s-1850s dressmaking! This pattern is easy to use, incredibly detailed, and wonderfully versatile - I even made an evening gown with this pattern by using the bodice flatlining pieces for View B!
I used the bodice pieces from View B, the sleeve pieces from View A, and the back pieces from View C. All of the pieces in this pattern easily mix-and-match with each other!
Changes to the Pattern
The gathered "fan front" is a distinct feature in many 1840s dresses. I noticed that some original fan front dresses had a taller area of gathering, so I added an extra 8 rows of gathers to my bodice. Instead of sewing my gathers on a sewing machine (which, let's be honest, just scrunches up the fabric between stitches rather than actually gathering), I sewed them by hand like cartridge pleats, with parallel rows and perpendicular lines of stitching.
I also noticed that the pattern pieces for the front bodice create a rather wide curve at the center front waistline - like a duckbill shape. From a pattern drafting standpoint, it makes sense that there is extra allowance here; sewing up darts and gathers on a narrow, pointed piece of fabric would be tricky. To achieve the handsome, period appropriate pointed front waist, I trimmed [with a great deal of courage] the center front fabric to create more of a pointed, curved waistline AFTER I sewed the bodice gathers and attached the bodice to the flatlining.

Sewing It All Together
The instructions in Laughing Moon #114 are very easy to follow, with lots of illustrations. Additionally, I had Elizabeth Stewart Clark's amazingly comprehensive The Dressmaker's Guide at hand - I highly recommend perusing the free articles and tutorials on her blog and buying her book for in-depth, supplemental information for mid 19th century sewing.
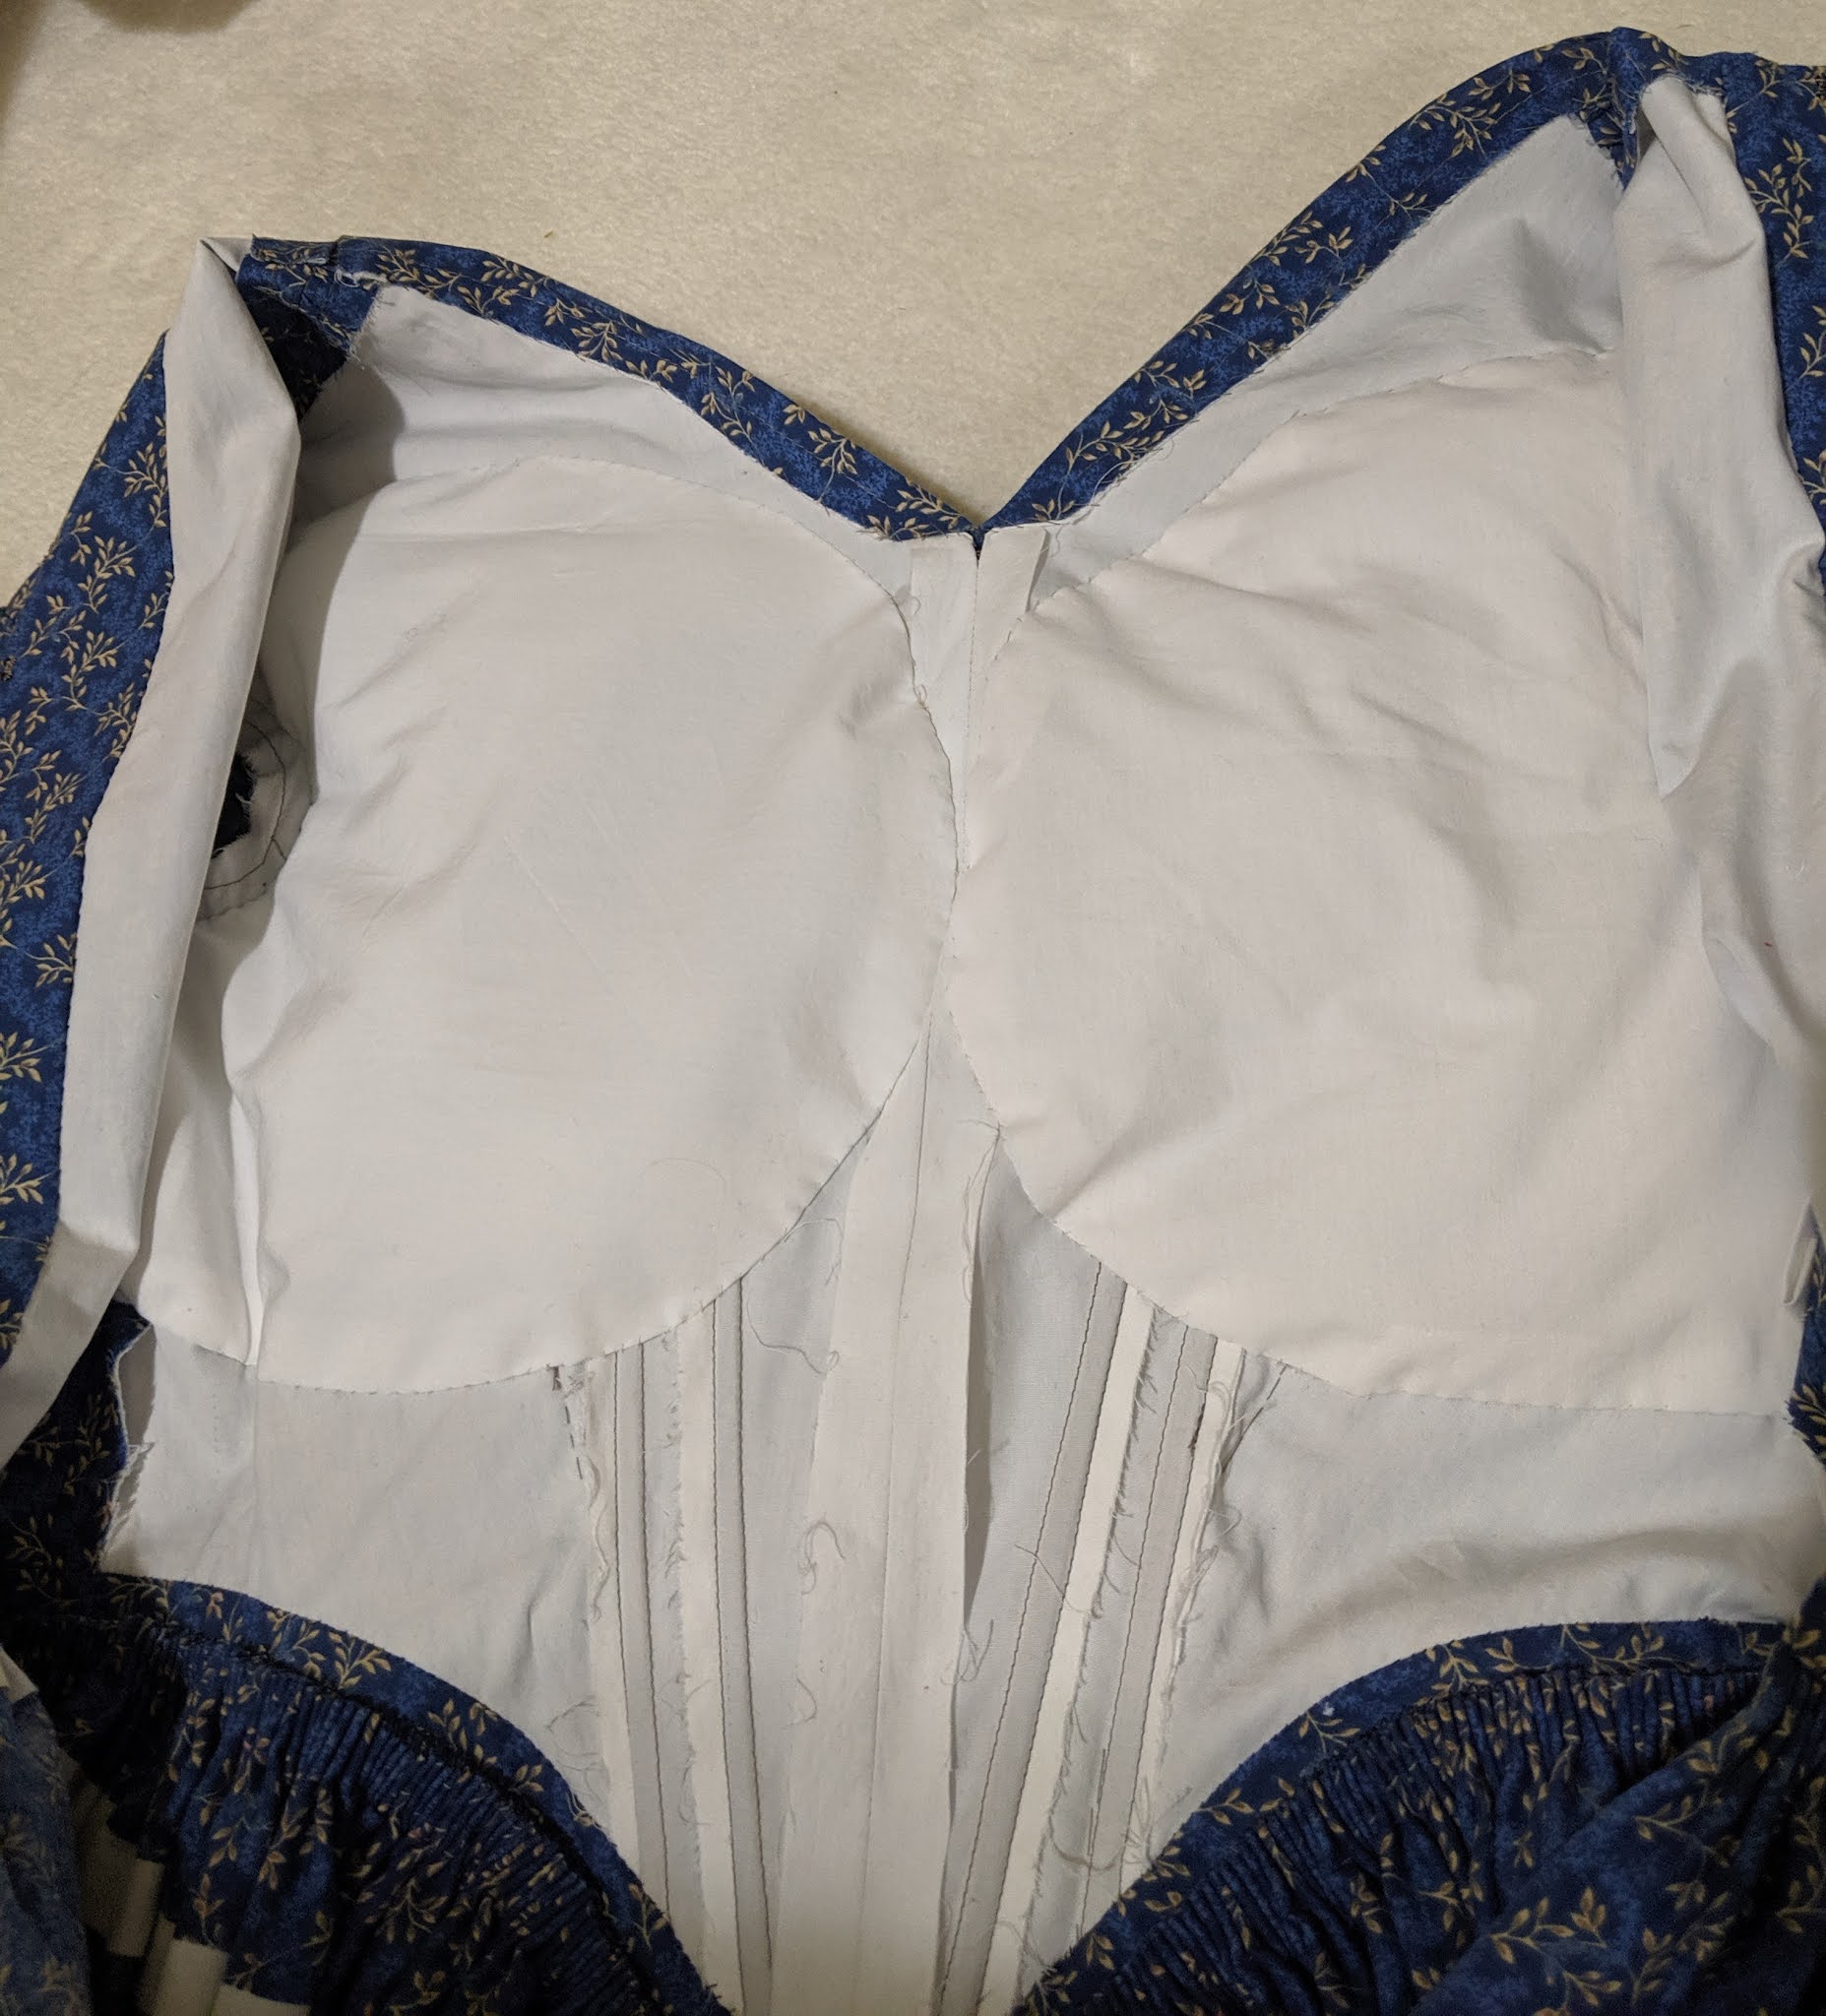
Darts are sewn into the flatlining muslin layer, and an additional line of stitching is made 1/4" away from the dart seamline so that a piece of boning (I used plastic zip ties) can be inserted into the dart.
Additionally, two half-moon shapes were whip-stitched onto the bodice flatlining and lightly stuffed to create bust pads.
The sleeves are cut on the bias, which is necessary for the tight-fitting design. The sleeves are also flatlined in white cotton muslin. At the wrists, the sleeves are simply turned up 1/2" and whip stitched to the flatlining.
The back of the bodice is finished by folding down the fashion fabric to create a facing - I also trimmed down the muslin flatlining under the facing to reduce bulk. The bodice fastens with hooks and eyes, which are stitched to this facing.


The bottom raw edges of the bodice have piping sewn to them; the seam allowances of the piping are then flipped up inside the bodice and stitched down to conceal the bodice raw edge!
The top edge of the skirt is folded down (1" folded down at the back waist, almost 4" folded down at the front waist to accommodate the bodice point) and then cartridge pleated. Despite the amount of time the cartridge pleating consumed, the effort was worth it - those crisp, defined pleats are my favorite feature of this dress!
At the moment, the skirt hem is simply bound with black grosgrain ribbon. One day I'll replace that with an 8" deep cotton hem facing.

Final Thoughts
I made this dress without making a muslin and I think it shows in some places. In my next iteration of this dress, I'll shorten the back waist by about 1/2" - as it currently is, without any adjustments to the pattern, the fabric buckles a bit at the back waist. I'm short waisted, and honestly surprised that the back waist fit isn't worse!

The other fit issue is on the shoulders (I know I have narrow shoulders, so I should've known to adjust this!). You'll notice that the fabric gapes at the neckline and shoulder seams, even despite having the bust pads in the bodice.

You can see how this dress is put on, and what undergarments I wear with it, in my video below: