Over four years ago, I used
Butterick 6196 to make the blouses for the
Italian Tarantella costumes. In my innocence, I followed the pattern instructions religiously, not questioning impractical or complicated steps.
Since two blouses ripped along the side seam last year, I had to make two new ones before this year's performance. With the new blouses I wanted to address some issues with the previous ones:
1. Finish the seams to prevent fraying of the fabric and to make a stronger seam.
2. Figure out an easier way to hem the sleeve.
Issue # 1
Butterick 6196's instructions for the blouse do not mention finishing the seams in any way. The seam connecting the bodice and raglan sleeve is stitched twice, first with a normal seam allowance and again 1/4 inches away in the seam allowance. I found this to be stiff and scratchy, and in the end it didn't prevent the seam from ripping after several performances.
 |
| All this fraying occurred only 1 hour after cutting the fabric! |
My Blouse 2.0 was made with french seams on all seams. This helped to make the seam both strong and unfrayable. The aesthetics of the blouse also improved as you couldn't see the raw edges through the sheer fabric anymore, and dangling frayed threads were eradicated. Though it took twice the time, it was worth it.
 |
| The side seam |
 |
| The armscye seam was a bit wobbly... |
 |
| ...but was easily coaxed into submission by my iron! |
Issue # 2
Butterick 6196 has you put elastic in a casing near the wrist of the sleeve, sew the side seam of the sleeve, and then hem the sleeve (with a narrow hem, no less!). Now, imagine this: nearly 2 feet of fabric gathered to a circle of about 4 inches in diameter. Turning a hem, narrow or otherwise, becomes extremely difficult and time-consuming as you try to wrangle the curved and gathered fabric.
 |
| Old blouse on the left, new on the right. Look at the wobbly, puckered seam on that sleeve! |
On Blouse 2.0, I hemmed the sleeve
before putting in the elastic and sewing up the side seam. This way, I had a flat expanse of fabric to hem, rather than a tightly scrunched ruffle. You can see the difference in the photo above. The drape of the ruffle created by the elastic casing is positively affected by the nicer, neater hem. Hemming it this way was both easier and faster.
 |
| This neat, flat hem was created before the sleeve was sewn up. |
 |
| Applying bias binding for the elastic casing. |
 |
| Hemming the sleeve this way was both easier and faster. |
Other Changes:
For the neckline elastic, Butterick 6196 instructs you to create the elastic casing out of bias binding. As the neck area is so large, I found this both wasteful and fiddly. I created the casing by creating a 1/2 inch hem along the neckline of the blouse.
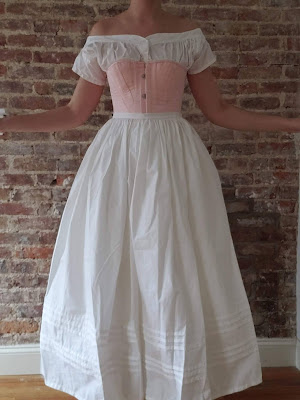
The pattern instructs you turn the lining of the bodice to the inside, sew the shoulders together, and trim the edges of the bodice in 1/4 inch wide ribbon. This was difficult to manage with a boned bodice, so instead I put the lining and outer fabric wrong sides together and stitched along the lower, front opening, neck and armhole edges. The raw edge was then covered in 1/4 inch bias binding at the advice of a sewist neighbor. Sewing ribbon to all those curved edges would have been nightmarish!
If I ever make this bodice again, I will also change the boning layout. The boning cases are arranged in the middle of the side back and side front pieces. Taking inspiration from period garments, I would instead put the boning along the seams.
Do you usually follow pattern instructions to a T or disregard them?