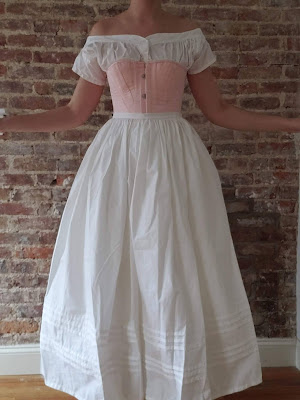
Handsewn 18th Century Linen Shift


Lately, I've been expanding my 18th century wardrobe, and with a few 18th century events planned (though they've since been cancelled/rescheduled due to COVID-19), it was time to add a proper 18th century shift to my rotation. I've been using my cotton regency shift with my 18th century outfits, but I don't enjoy how the short sleeves get stuck inside the long sleeves of my jacket and gown. I also love using my historical chemises and shifts as nightgowns, and it's been a few years since I made a new one!
Materials
I used "Snow White" light weight linen from FabricMartFabrics. The linen was pre washed in scalding hot water in my shower (tiny apartment problems!). It it soft and tightly woven, excellent quality for the price, especially if you can get it on sale. My piece of linen was 54" wide selvedge to selvedge, and 2 yards long. I used historical cutting techniques, which prioritized fabric economy, to cut out my shift. I still have enough fabric leftover to use for caps and linings!I used linen thread from Burnley and Trowbridge and wax from LBCC Historical. Waxing your thread, especially linen thread, keeps it from fraying and tangling.
Pattern
I used Simplicity 8579, the more historically accurate of American Duchess's two shift patterns with Simplicity. This pattern is great if you'd like to make a historically accurate shift with some modern shortcuts. It includes underarm gussets and side gores, but recommends you to use french seams rather than the more historically accurate (and frankly less fussy) flat felled seams.I made some key modifications to the pattern to make it as historically accurate as possible. I only used the pattern as a guide for how wide to cut my body panel, side gores, sleeve gussets, and neckline.
 Per the very knowledgeable Sharon Burnston (I highly recommend reading her research before starting your own shift), I cut the body of my shift in one panel that was 39.5" long (the length of my piece of linen fabric after pulling threads to square it) by 25" wide. Instead of cutting the side gores as separate pieces, as the pattern suggests, I cut them from the body of the shift.
I cut the neckline per the pattern, and was very pleased to discover that I was able to cut "the gussets from the bosom," as the 1789 manual Instructions for Cutting Out Apparel for the Poor instructs. Fabric economy played a significant role in the cutting and sewing of garments in the 18th century and beyond. Shifts and shirts, the most basic undergarment worn by all people in some form, was an exercise in geometry to minimize fabric waste. I was able to cut both underarm gussets AND sleeve cuffs from the scrap left from cutting out the neckline!
I also modified the sleeves. I wanted a fuller, mid-century style sleeves, so I cut out two rectangles 14" long by 17" wide. These sewed up into moderately voluminous sleeves that end at my elbow.
I sewed the whole shift by hand with a 3/8" seam allowance.


Sewing the Side Gores
Per Sharon Burnston's instructions, I flat felled the side gores - first felling the gores to the body of the shift, then felling the front to the back of the shift. My side gores are cousins, not twins!


Sewing the Sleeves, Gussets, and Buttonholes
I stroke gathered the top and bottom of the sleeves, and set the bottom into cuffs. Sewing the sleeves took about 20 hours, and was the most labor intensive part of the shift!


My tip for buttonholes is to outline the buttonhole with heat-soluble ink (I love my Frixion pens). I then do a basting stitch along the outer pen lines. Then I cut along the slit of the buttonhole, and sew a buttonhole stitch around the slit, pulling the purl of the stitch towards the slit.
My buttonholes don't come out perfect, but they're good enough for me! I then threaded a silk ribbon through the buttonholes, but I might change this to a twill tape - the silk ribbon doesn't stay tied very well, and I want to use this shift as a nightgown regularly.


My buttonholes don't come out perfect, but they're good enough for me! I then threaded a silk ribbon through the buttonholes, but I might change this to a twill tape - the silk ribbon doesn't stay tied very well, and I want to use this shift as a nightgown regularly.


