Making an 1847 Fan Front Yoke Dress | Modifying Laughing Moon 114

My last project was creating a yoked, fan front 1840s dress - these are my favorite types of dresses to make! I tried copying this charming cotton print fan-front, dated to 1847, in the collection of the Metropolitan Museum of Art.

You can watch my Youtube video for an in-depth look into my research of 1840s yoked dresses and process for making this dress.
This fabric is Windham Fabrics Civil War 4 by Nancy Gere. The fabric label says it's c. 1860, but I think the design is plausible for the 1840s - it's close enough for me.
I bought this fabric from a Facebook group, and it came in two pieces - one approximately 3.5 yard piece, and one approximately 1.5 yard piece, so I had to get creative with my fabric cutting!

Making the Skirt
The skirt is made from 3 panels of 45 inch wide fabric, for a total hem circumference of about 135 inches. Because of my limited fabric, I cut each panel to be a scant 42 inches tall - barely enough for my waist to floor measurement plus seam allowances.
The panels were seamed up, selvedge to selvedge, with no seam finish - it wasn't necessary with the selvedge edges! I left about 10 inches unstitched on one seam for the back opening.
The bottom of the skirt was finished with an 8 inch wide hem facing. The top of the skirt has two rows of gathering stitches, 1/4 inch apart, to create cartridge pleats. I used normal poly-cotton sewing thread, and waxed it before sewing the cartridge pleats for strength.


Making the Bodice
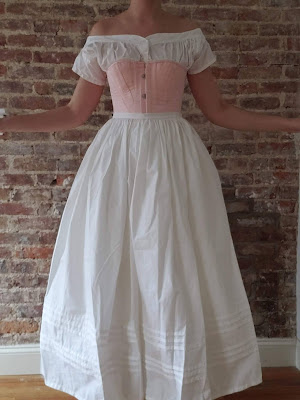
I used Laughing Moon 114 as the base for the bodice - I think this pattern has the perfect bones for an 1840s dress. I modified the pieces for View B gathered front, View C flat back, and View A sleeves. The darted bodice made from View C became the flatlining, with the gathered striped cotton overlay sitting on top. The lining has bones in the front darts and side seams.
After modifying the pattern pieces for the gathered overlay, this is what my fashion fabric pattern pieces looked like. Clockwise from top left: sleeve, yoke, gathered overlay, side front.


The bodice overlay was gathered by hand, with essentially cartridge pleats space 1/8 inch apart. Piping was added between the yoke and bodice, along the neckline, and around the armscyes. Because of my limited fabric, I had to piece together the piping from dozens of tiny (between 2 inches and 4 inches long) bias strips!
The waistband was whip stitched to the bodice, with a separate waistband facing covering the raw edges of the bodice, waistband, and piping. The skirt cartridge pleats were stitched onto the waistband facing, just behind the waistband piping.
The bodice is fastened in back with hooks and eyes placed 1 inch apart from each other. The hooks were stitched about a 1/2 inch away from the back edge, and the eyes were stitched along the other back edge. There was no standard "direction" of fastening at that time, but I chose to fasten my bodice right over left, which seemed to be common.

Making the Sleeves
The sleeves are a shortened and slightly narrowed version of the View A sleeves. I wasn't able to cut them on the bias, per the pattern's directions, but with sleeves this short, I don't think it made a difference.
I did have to move the armscye piping and sleeves up about half an inch near the shoulder - the original shoulder line in the pattern was far too low for my petite frame.


The sleeve ruffles were pieced together from scraps, with the piecing seams being flat felled. The ruffles are only about 1.5 times the circumference of the sleeves, but this reduced fullness works perfectly. The ruffles were finished off with a narrow 1/4 inch hem, gathered by hand, and hand sewn to the sleeves. The top ruffle is placed 4 inches away from the sleeve hem, and the bottom ruffle is place 2.75 inches below the top ruffle.
Video Tutorial
You'll find detailed, step-by-step instructions on how I made this 1840s dress in my YouTube video below:
As always, I welcome you to reach out to me if you have any questions! I also love seeing what you make from my tutorials - feel free to tag me on Instagram @pour_la_victoire