1520s Florentine Gown | 16th Century Kirtle Remade


Nearly ten years ago, I used a beautiful pink worsted wool from Burnley & Trowbridge to make a generic 16th century kirtle. I did a pretty good job with stiffening the bodice with canvas, but some things weren't working:
  • Bodice was too long
  • Bodice point was anachronistic for the simple styling
  • Skirt was cut as two selvedge-to-selvedge panels so was unwieldy and bulky at the waist
  • Skirt was faced with a scratchy nylon wool blend fabric and decorated with a wimpy velvet ribbon
It sat in a bin for years until I finally decided to restyle this beautiful fabric into something I'd actually wear to dress-up events.


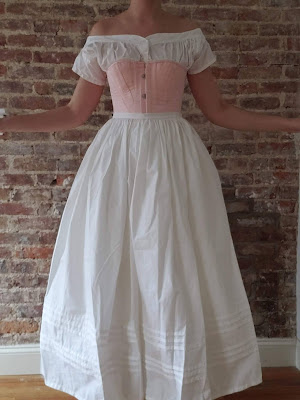
My original kirtle, worn a few times to Renaissance Faires 

Pulling the kirtle out of the bin revealed that the back skirt panel was scattered with moth (?) holes and mysterious stains - I think I spilled coffee on it or sat in something dirty and put it away without cleaning it, ugh. Thankfully I had a big scrap of fabric left. It was time to get out the seam ripper and rework this gown!

I knew I wanted an Italian style 16th century kirtle, or gamurra. I wanted to revisit the black contrast velvet ribbon on my initial iteration, so looked for those examples. I landed on this gown in The Preaching of St. John the Baptist (1520) by Francesco Ubertini


The first area to tackle was the skirt. I unpicked it from the bodice, removed the velvet trim and hem facing, and separated the skirt panels. I cut a new back panel, with two large triangular gores, and cut two smaller triangular gores from the front panel (loosely following the cutting layout of Eleanor of Toledo's burial gown). I also cut a matching lining out of red cotton broadcloth (satisfyingly, I had just enough fabric) as I saw a hint of contrast lining in some paintings.

Which cutting layout did I use? I have no clue...

The new cotton skirt lining

You'll find that cutting gored skirts in this manner (with right angle gores) creates areas at the hem where the gores don't match -- this is perfectly fine and expected. At this stage, round out the hem here for a graceful curve at the side seams.

I'm so glad I went for the skirt lining, because the finished skirt hung so much better as a result. It truly made all the difference, and I used up a cotton fabric I otherwise had no purpose for. Sure, linen would've been more appropriate as a lining, but at the end of the day I'm doing fancy dress up with friends so can't take all the details too seriously. 😅

The skirt and skirt lining were joined together at the hem, along the skirt openings at the side seams, and along the upper edge. 

Next up to tackle was the bodice. I marked where the new waistline should be -- a full inch higher than the original, and I probably could've gone a smidge higher still. I wanted to add contrast black trim to the bodice, so I applied that next: 5/8 inch wide black grosgrain ribbon along the neckline, and 3/8 inch black grosgrain ribbon below that. I added some addition trim on the back of the bodice.


I secured the ends of the trim on the back bodice to the waist area before reattaching the bodice lining. Note how I gave up the bottommost eyelets when I shortened the bodice!

The bodice was stiffened with two layers of cotton canvas sewn together at regular intervals -- The Couture Courtesan used this method in her 16th century kirtles, too. I removed the seam allowance at the waist edge of the canvas stiffener, then folded the fashion fabric up around it and finally covered it all with the linen lining.


Almost done... I then repleated the skirt, with knife pleats all around and an inverted box pleat at the center back. The pleats were whip stitched to the bottom edge of the bodice (the same way you'd attach cartridge pleats) so the whole skirt kind of "hinges" at the waist.


What a massive improvement so far... the bodice hugs me just right, the skirt has oomph while being lightweight, and the drape of the skirt creates a pleasing, gentle a-line effect. Just so satisfying! I eventually added 1.5 inch wide black grosgrain ribbon to the skirt and created a back black satin sash decorated with drapery tassels, as in my inspiration image. 

Next up, the bag sleeves. Admittedly I was a bit lost at this step, but as I was purely conjecturing on their construction I decided to "wing it" and sew them entirely out of polyester from my stash and on the sewing machine. I started with a sleeve pattern from The Tudor Tailor, and then altered the shape until I think... it's a bag sleeve? ... Who knows. The finished sleeve certainly is a bit too wide at the armscye and so long as to be a nuisance, but certainly dramatic enough for photos.


The sleeves are bright blue polyester satin on the outside, cream polyester satin on the inside, and the sleeve seam is edged in metallic gold thread. They tie onto the bodice via little metal rings my husband used for a chainmail project.

And it was all finished just in time for a vibrant and fun fall photoshoot at Fort Tryon Park with the New York Historical Costumers Society. A day full of joy, swishing skirts, and spontaneous historical dancing.


Popular Posts