How to Sew a Victorian Petticoat with Tucks | Historically Accurate Method
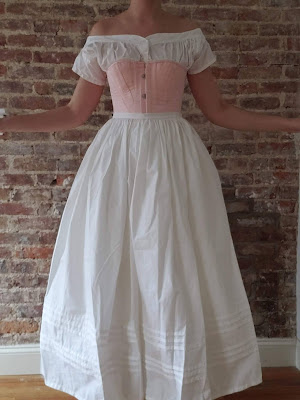
After I completed my corded petticoat in 2019, I made a tucked petticoat to wear over it for additional floof. Below is a tutorial for my process of making this simple, easy, and versatile mid-19th century petticoat.
Step 1: Determine how wide and long your petticoat will be
Measure twice, cut once! I intended to wear this petticoat with my 1840s clothes, so I kept it simple.
I like my petticoats to be hemmed just above my ankles. I also make the waistbands on my innermost petticoats wider than the waistbands on my outermost petticoats/skirts so that I can "stack" them and reduce bulk at the waist.
My petticoat is made of 3 rectangles of pima cotton that was 44" wide selvedge-to-selvedge. This gave me a total hem circumference of about 135 inches or 3.5 yards! Petticoat circumferences should fall between 120-140 inches in circumference for the 1830s-1860s. You can adjust the number of panels in your petticoat dependent on the width of your fabric (ex. use 2 panels of 50" wide fabric).
Each rectangle was my desired length from waist to hem, plus one inch for seam allowances. If you're making tucks, add length to the petticoat (eg. for three 1/2" tucks, add 3" to the length of the panels). If you're adding lace or a ruffle, subtract length from panels.
Step 2: Cut panels and sew them together
I cut off the selvedges from my panels, because the selvedges were bulky and punched with holes. If you're using fabric with a narrow, tightly woven selvedge, you don't even have to flat fell or finish off the seams - just stitch the fabric together at the selvedges!
I sewed my panels together with flat felled seams that were a scant 1/4" wide. Upon examining some antique petticoats and undergarments, I determined that not only did undergarments from this period have very narrow seam allowances, they also had a small stitch length. I lowered the stitch length on my sewing machine, and pressed and trimmed my seam allowances carefully to recreate these narrow seams.
I left about 10" unstitched on one seam - this will become the placket opening on the petticoat.
(Optional) Sew tucks, lace trim, etc.
I love adding a few tucks to my petticoats. They allow me to adjust the length of the petticoat at a later date, add a bit of stiffness to the petticoat hem, and just look cute! Sewing tucks is easier than it looks, especially on a crisp fabric like cotton broadcloth. Determine how many tucks you'd like; I made a total of 6 tucks, each 1/2" wide (so each tuck took up 1" of fabric). I (arbitrarily) picked a location for my lowest tuck, then folded the fabric, pressed, and stitched 1/2" away from the fold. That's it! The next tucks are measured from the first tuck; the space between the tuck is entirely up to you. I also show this process on my 1860s drawers video tutorial.
For some reason, I prefer an even number of tucks; there's just something pleasing about it. I sewed my tucks in groups of 3, with a big gap between each group, just because I liked it. Choose your own adventure!
You can also add lace trim or a ruffled flounce to your petticoat hem.
Step 3: Hem your petticoat
This one is easy: I usually press up 1/2" on the bottom edge of my petticoat, then press up 1/2" again to enclose the raw edge. The hem can be stitched by machine or by hand.
Step 4: Placket opening
Sewing plackets is always tricky for me. I made it extra challenging this time by putting the placket opening in a flat felled seam!
I started by cutting a slit in the seam allowance where the side seam stitching ended. This slit will allow me later to flat fell the side seam allowance and have extra fabric for the placket turnover.
Next, I trimmed the seam allowances so that I could create my tiny flat felled seams (why did I make this so challenging for myself!). The 1/8" seam allowance will be covered by the 1/4" seam allowance.
Plackets have an overlap and an underlap. On the side that would become the underlap (covered by the overlap), I trimmed the seam allowance to 1/4". Then, I flat felled the side seam and underlap seam. Whew!

After a good press, fold under the seam allowance on the overlap side of the placket. You'll start to see how everything lines up! Stitch down the overlap seam allowance and rejoice in your itty-bitty flat felled seam placket! I also added a few hand stitches at the base of the placket to help keep things secure.
Step 5: Gather top of petticoat
You can gather the top edge of the petticoat by machine, but I find that machine-sewn gathers are nothing more than the fabric scrunched up between stitches. It takes a long time to do, but hand-sewn cartridge pleats/gauging has several benefits:
- cartridge pleats/gauging is a documentable, historically accurate method
- easy to compress a large amount of fabric to a narrow waist
- the volume of the cartridge pleats/gauging adds "poof" to your hips, helping you achieve the mid-19th century silhouette
- it looks pretty!
I use graph paper to help mark the dots for where the stitches will go. Then it's just a matter of stitching, and stitching, and stitching until you can pull up your gathers to fit your waistband!
Step 6: Attach waistband and add closures
I cut my waistband as follows:
Waist measurement - 26"
+ 1" length for seam allowance
+ 2" height for waistband
+ 1" seam allowance for waistband
For a final waistband rectangle of: 27" x 3"
Press the waistband seam allowances to the inside, and press the waistband in half along its length. Line up the seam allowance of the top of the (gauged) petticoat with the folded edge of the bottom of the waistband. Divide the skirt into halves, then quarters, then eights, etc, and match it up to the waistband at its half, quarter, eight points. I find it really difficult to pin at this stage, so I use a few tacking stitches instead!
Sew a whip stitch through each "hill" of the gathers. There's a great tutorial on this technique here. Flip the petticoat to the inside and fold the waistband down to fully encase the gathers. Now whip stitch through each "hill" of the gathers from this side!
I hemmed the short edges of the waistband by turning the seam allowances inward and whip stitching along the edge.
Finally, I marked the placement of the button and buttonhole. I drew the shape of my buttonhole with a heat-soluble pen to make my stitches neater! Then I sewed a buttonhole stitch around the slit, using 1 strand of waxed cotton embroidery floss. The petticoat fastens with an antique porcelain button.
If you found this tutorial helpful, or have any questions, please leave a comment below!


